Thursday, March 16, 2023

Lighting Floor Plan Diagrams

 One of the key assessment criteria you need to meet is 'Communication'. You need to be able to show a variety of communication skills that enable you to convey ideas and explain things. One of the skills that you can demonstrate in your work is the ability to communicate through visual means such as sketching and drawing.

The opportunity to do this within your work arises frequently in the form of lighting 'Floor Plans'. These occur in real life situations where you might be discussing light theory with your assistant or partner when coming up with lighting set-ups or approaches to dealing with tricky lighting on location.

They also serve the purpose of having a record of your lighting techniques. Photographers often use a 'Day book' where they might record such things as their lighting set-up, so that if they have to return to a technique that is new or rarely used they have a point of reference e.g. a diagram.

This below is a lighting diagram for the pinhole images shot on the balcony.


These diagrams also illustrate your technical knowledge and the depth of your understanding with regards lighting. 

On your first task 'Pinhole Photography' you're allowed to copy this directly into your work as long as you reference it e.g. use the website link and explain that it's my work and copyright.


This image here below is a studio lighting diagram, but has a whole series of symbols that can be potentially used to create your own lighting diagrams for general use in explaining where your light is coming from and the types of light used and its quality and characteristics. This will be covered in future lessons, but the sooner you adopt the use of lighting diagrams in your planning and explanations the better. 

Lighting diagram symbols


Liquid emulsion lesson


We'll be printing B&W negative using the liquid emulsion paper you prepped months ago. Ideally you'll either use, your best medium format negatives or your best 35mm film negatives. You've only prepped a piece of paper that is approximately A3 in size, We advise that you cut this into 4 smaller pieces (approximately A5) and aim to to produce 2 good images.

If you're working with medium format you'll be in the darkroom with the big door  and if you're using 35mm negs the other darkroom (Small door). With this process there is no stop bath, the prints go from the developer straight into the fix. 

Use test strips, Set the enlargers aperture to f8 and use 5 seconds initially and see how that works out. The chemical is pre-graded and there should be no benefit from using the filter. If your images are flat, the only real adjustment is to shoot using far more contrasty film... Slower FP4+ or Kodak TMAX 100 or the Harmon 100 film. Or shoot using contrasty light.  

Dev 90 secs - Fix 4 mins. - wash 5 mins

Drip dry the prints on the window initially and then dry flat on old newspaper or similar to absorb the moisture in the print. Dry slowly. If you're presenting as a hard copy you might iron the prints flatter before mounting.? 

You'll need to scan the prints. Scan at 600 dpi for portfolio purposes and 100dpi to add to your design sheets.

As this is an In class task this work is the type of work that should be added to the new word document posted  above (Skills and Knowledge design sheet). Under the heading liquid emulsion.  Use images of your work and the stages involved along with explanations. 

*Remember. Once you've done this in-class task, the idea is you're supposed use the technique again (if appropriate) independently, e.g. treat and prepare you're own paper/support and try/experiment in conjunction with your own theme. In some instances this might be your final technique as it might suit your work and theme. This would potentially be the case if your theme was around 'Decay' or similar and would reinforce the fact that the work is 'Art Photography' potentially. 

Wednesday, March 15, 2023

File size and type changing (Batch processing)

 How to convert Raw files to JPEG's and reduce the size of JPEG files straight off the camera as a batch.


1. Create 3 folders.

  • A folder with the horizontal files you want to convert (Change type or size).
  • A folder with the vertical files you want to convert.
  • A Destination folder where the images once converted will be saved to.

Open Photoshop and set to Photography work space.


In the top LH corner...

Files
Scripts
Image processing


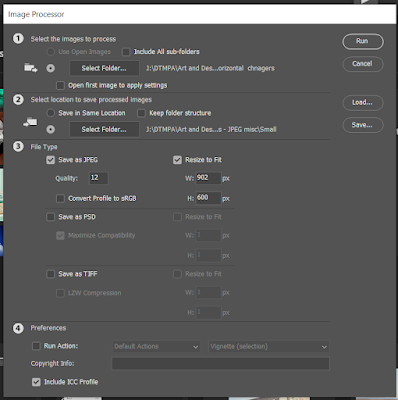
This box then appears...
(1). Using select folder choose which folder you want to modify. (Don't click anything else).

(2). Using select folder choose your destination folder.

(3). At this stage, you'd normally choose Save as JPEG. Set the quality to 12 and then in the re-size to fit if its a horizontal (Landscape) shot...
W 902 H 600
If its a vertical (Portrait format) shot...
W600 H 902

Ignore 4 and click Run in the top RH corner.

Dependent on how many files you're converting, their size and how good your internet connection is it may take some time, so only do this with the images that you need. Apparently a 1000 large Raw files converting to JPEG could take up to 2 hours to convert.

Whereas reducing 20 files from big JPEG's to smaller as above just takes a couple of minutes. 


Personal Progression

 (1).  Put your name on the front page along with the task title Unit B1 Personal Progression What will I do at the end of my course?  Write...