Friday, September 30, 2022
Client file size/type requirements
Thursday, September 22, 2022
Studio guidance - Lecturer directed stage
- Equipment used in conjunction with the studio
- Model agencies - what they do, how they work
- Go-sees
- Model test shoots
- Roles associated with shooting in the studio
- Studio H&S
- "Go see" style images of your model shot in a totally different environment using daylight. A head and shoulders shot and a full length shot. With a short description of your model with the details that a model would have on their 'Comp card' also known as a walker or Index card.
- Wide shots of your set - 2 or 3 images that show where your lights are in relation to where the model is positioned. Ideally get someone to shoot one of these images from a distance that show you in the shot taking the pictures, again showing the lights as much as possible and the model.
- Health & Safety Shots images that show either potential H&S issues or show that you've attempted work safely.
- "Talent" Also known as the other people involved in your shoot. You should do an image of your assistant/s with a brief explanation of their role. Similarly anyone else that helps with your shoot.
- Equipment the lights that you use -close up and any additional equipment you feel worth mentioning.
- The Photos Add 9-15 of the best images from the shoot (Page to a page and half if your use 9 per page which is the recommended size on an upright page.
- Photoshop work If you do any post production e.g. the images will need to be adjusted using 'Auto-colour' use a screen grab.
- Portfolio full page images x 2 (Up to 4 if you've got 4 slightly different images).
- Finish off with a reflection. Use the standard prompts but with the analysis try and pick 5 key things you've learned in the previous week. Then be really self-critical and analyse one of your better images in terms of does it have any value in terms of being a potential fashion image? What more would you have to do to may it look like an actual fashion image? If you make an argument for the work being pretty near a professional image - justify your case by finding something very similar on-line or in a magazine and comparing.
Wednesday, September 21, 2022
Writing plans for Photo-Shoots
Throughout your work you're required to write up plans for you Photo shoots.
So, what do I write and how much?
With regards to the question how much - there's no answer, but, you're looking to attain either passes, merits or Distinctions. Distinctions obviously require far more detail and evidence of knowledge and organisation. Plans will generally follow the use of reflection - Reflect - plan - Do.
Updated 3/3/25
Typically the things that you should detail in your plan...
- Your idea/intention - outline of what you're going to do/learn
- Describe the potential operational context of the shoot
- When you plan to shoot.(You can include a weather report if shooting on location outside).
- Where you're shooting the pictures.
- What camera you'll be using. (You can use images)
- What media your using.
- What focal length you'll be using.
- Whether you'll experiment with different focal lengths or change lenses.
- What kind of lighting you'll be using - soft, harsh, diffuse, point etc.
- If your copying someone's lighting techniques say who's.
- Who your model will be.
- Whether you're using tripods, reflectors, or any other equipment.
- Who your assistant will be.
- What you're testing out.
- Transport details
- Details about emptying SD cards - charging batteries.
- Contingency (Back up) plan in the event of any changes - models/light/weather
- When you intent to have films processed by and the work in your design sheet.
- Any H&S issues and how you will address them.
- Problems you'll potentially encounter and methods to resolve them
If within your assignment you have a requirement to plan - the following guidance may be helpful.
Dependent on what course you're doing there will be several units that require that you identify that you have planned parts of your work, there may also be a component that asks for you to clarify your intentions.
Planning should be identified at all stages when you undertake the production of work... Photography or Art.
Use these prompts below to generate your plan
1. Clarify (Describe) what the intention is e.g. why you're making this work, making a direct link with the assignment content.
2. Where - say where your making the images - studio, location, explain why you're doing it there - strengths and weaknesses of the location/studio. Problems you might encounter what you'll do in advance to alleviate those problems.
3. When - The date, time, explain why at that time, especially if on location - as the light will be dramatically different at different times of day. Be as technical as you can when talking about the light. Write about the time in terms of urgency and the assignment deadline.
4. What with - What camera and equipment are you using, what focal length lens, what tripod, what additional equipment will you need - will you have a back-up camera? Use a check-list in your book, have everything on the check-list - Empty SD card, charged batteries, additional batteries and SD cards. Tripod plates, cables, hotshoe adapters, light meters, extension leads, flash heads and other studio kit (Use the names/brands of the equipment).
5. How (Technique) - Explain how you're going to shoot the images, what approach will you use, how do you want it to look? Is it going to like or borrow something of a famous photographers style or technique? How are you going to ensure that you get the exposures right - what method will you use to do your light readings - maybe explain what metering pattern you use and say why. What are you going to do about your backgrounds? Do your backgrounds play an important part in the images visual language/narrative? How are you going to use the back-grounds - out of focus or in focus? How do you intend to use depth of field generally? What shutter speed will you hope to be using and why? What white balance will you use and why? What file type will you use and why?
6. Who with - Models, assistants, make-up artist, stylists, drivers etc. Who will you use as the model, could you find models? Are you using the same model again and again - why? Do you think that when you show your folio to prospective employers or Universities they might view this negatively? Have you used anyone else to style it or do any of the other roles in photography - see the image below of a Location shoot I witnessed as well as the photographer and the 1 model (Yasmin Le Bonn) there were at least 12 other people... Stylists, Make-up artists, hair-stylists, 4 x assistants, art director. Could your images be improved with more effort and attention to detail?
Whoever you do involve - say what their role is going to be as part of your plan.
7. Using what light Before you shoot, you should have some idea of the kind of light you want, what do you want the light to do - define shape, form and texture, or do you want light that wraps around the subject with low contrast? Again, make connections with other photographers work... I want to get the same effect as photographer a and b and write about the light using the correct terminology. With the light you should write about the time of day and weather and what you're hoping for - you could support this with weather reports - with images of charts showing the weather you'll probably get and then also include a weather contingency plan.
With the light - if you're in the studio use a floor plan diagram and add images or diagrams of the lighting equipment you're going to use and explain why and what effect this might have on the outcome.
8. Health and Safety Many of the units have a requirement to address H&S, so within your plan make sure you write about the H&S aspects that you have to deal with and explain what you do to ensure you, your model and any others that are involved in your shoot are also safe.
9. Weather Mentioned earlier - the weather has a massive effect on location shoots, you might want a particular type of light for your shoot that meets your creative intentions if the light isn't right, explain what you'll do to deal with the light being not quite what you want.
Studio Basics
Studio Stuff - Basics
Here's some guidance regarding using the studio.
Equipment - The list here is broken up into 2 sections the first part is a minimal approach and the second section is my recommended full list and the third section is for 'Hardcore' serious students that are seriously interested in learning Studio lighting techniques.
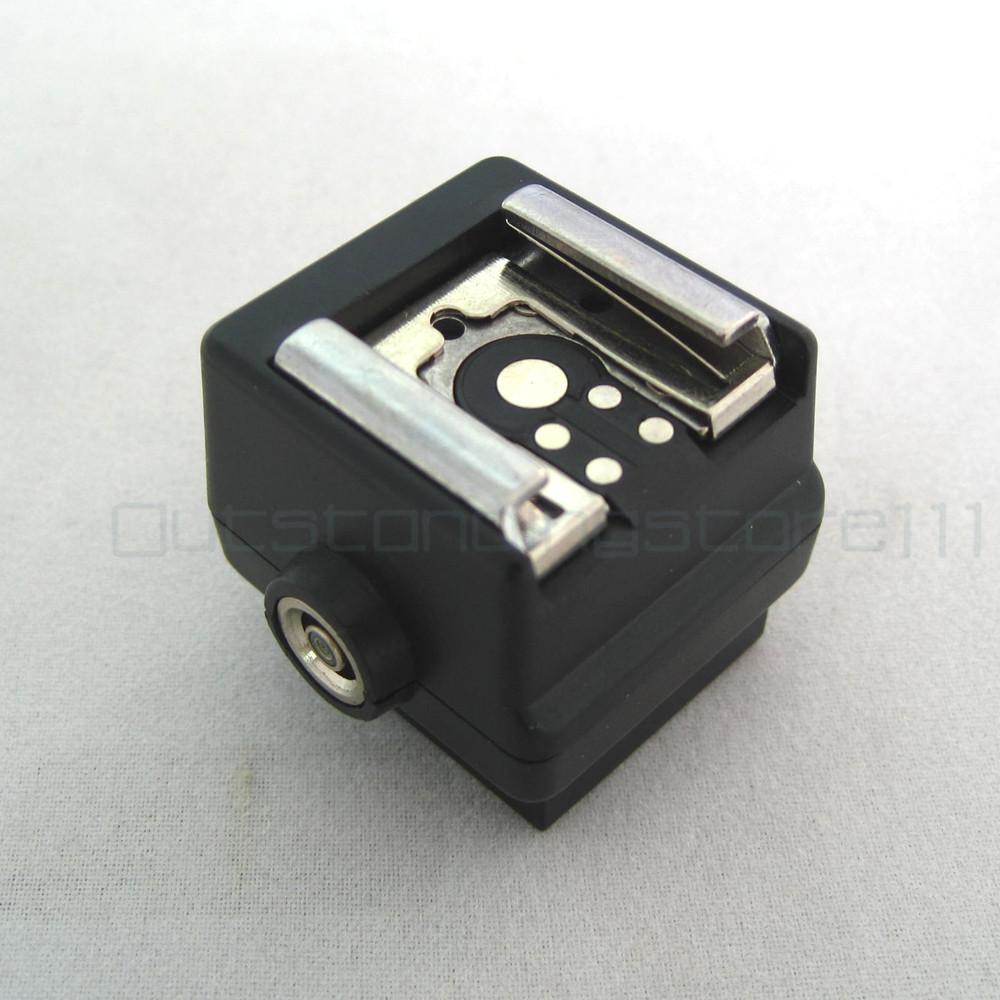
- Hot shoe adapter
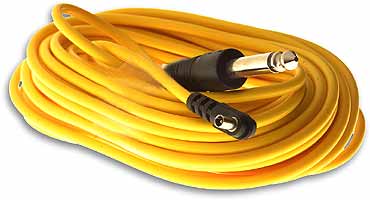
- Sync lead x 2
- Sekonic L308 light meter
- Tripod adapter
- Tripod
- Camera
- Lens with focal length of 55mm or longer
- Lens Hood
- Separate Slave (Wein)
- Extension cable (Sync)
- Extension cable (electric)
- Gaffer/Duct tape
- Masking tape
- Market Clips
- Modelling knife/scalpel
- String
- Tool box - Pliers, wire, screws, blue tac, string, fishing wire, a range of tapes, long nose pliers, nails, bulldog clips, crocodile clips, pegs, drawing pins,
Work in Progress Sekonic L308 flash/light meter.
The basic principle is - you measure the light that is falling onto the subject. This is the "primary" light source, you may introduce additional lights at different stages and the light readings will become more complex. So, in the first instance use one light and take a reading for that scenario.
Hold the light meter close to a key element of the subject. In the example above, it's a portrait, so the light reading is primarily for the face. Therefore hold the light meter almost touching the face (if not actually touching the face) and press the trigger button on the side of the meter at the top. This will trigger the flash and the light meter will register a light reading in the LCD panel next to the F (Largest number in the display). This will be the light reading measured in aperture values F2, F2.8, F4, F5.6, F8, F16 etc.
At this point you make a decision as to what aperture you want to use. Do you want limited minimal depth of field or maximum depth of field? Normally with a portrait, you want as much of the person in focus, so you would normally opt for an aperture of F8 or F11. These are also normally selected because your lens works best at these settings.
Get your assistant now to make the adjustments to the power output of the flash head, whilst you make the light readings.
Landscape Photography - Operational context
Work in progress.
Prompts to use... S&K design sheet work
Fine Art (Local galleries)
Editorial
self-published
posters
book illustration
Company reports
Stock photography
Target audience - demographics - clients - where seen - how used -
USP - saturated market
Examples of the worlds best - contemporary v traditional - explore Ed Burtynsky, Gursky, and some of the more contemporary photographers. Look at the The New Topographic's exhibition 1973
Saatchi website for standard prices
New Topographics: Photographs of a Man-Altered Landscape · SFMOMA
Tuesday, September 20, 2022
S&K - Professional practice (AC4)
Over the 2 years, you should record all of your professional practice knowledge and learning in your S&K design sheet which is continually updated and added to as you learn.
- MSDS's - example + explanation
- COSHH - example + explanation
- Health and safety pages - images and explanations - darkroom, studio, chemicals, PPE, lifting, carrying, surroundings, weather extremes, examples of photography that is intrinsically dangerous.
- Model releases - example + explanation
- Rights of use documentation example + explanation
- Research and analysis of the roles associated with shooting in studios - Assistant, 2nd assistant, runner, make-up artist, hair-stylist, set-builder, studio manager, food economist. models, model agent.
- Costs sheets - explanations of their use and rationale.
- Go-sees what are they, how to they fit into the studio process (Jurgen Teller)
- Look books - evidence of using them - explanations of their rationale (model shoots).
- Trespass laws - examples of do's and don'ts - Use Southend beaches as example - can you shoot/film on the local beaches.
- Privacy and Photography
- Copyright law
- Wide shots of a studio set with explanations as to why these are used in your work
- Floor plan diagram (Generic) with legend with explanation as why they're used
- Floor markings in the studio - why are these a thing
- Back-up and contingency planning - explanation of what they are and why essential
- Equipment checklist - example + explanation
- Research and analysis into Studio hire - where - what's available costs and process involved
- Research and analysis into location hire - where - what's available costs and process involved and range of options.
- Research and analysis into equipment hire - where can you hire from what's the process and what's available?
- AOP (Association of Photography) Who are they - why are they a need to know company
- BIPP (British institute of Professional Photographers - who are the - why do you need to know about them - What are LBIPP. ABIPP and FBIPP's
- NUJ (National Union of Journalists) Who are they - why are they a need to know company
- Portfolio presentation - Generic information and detail about options
- Website - Generic information and detail about options
- Workflow - what is it, why is it important
Create a separate dedicated page on the subject of...
Presentation methods, formats and conventions.
As with the other stand-alone pages, as you learn more about this aspect of photography return to this file/section of your work and add to it and keep doing so over the duration of the course and where needed add this content to the work you're doing, ensuring that it is contextualised in a relevant way.
What is the difference between Giclee and C-Type photo-paper (Digital Photography) see here https://www.theprintspace.co.uk/help/knowledge-base/difference-between-c-type-vs-giclee-prints/
https://www.redcliffeprint.co.uk/giclee-print-sample-pack.html
https://www.ilfordphoto.com/photographic-paper
https://www.theprintspace.co.uk/theprintspace-prints-sample-pack/
Saturday, September 17, 2022
Stand-alone pages - Lighting AC3 Technical
Also consider the wording of the criteria if you're looking to attain the higher grades...
demonstrates accomplished selection and skilful application of media, materials, techniques and processes, showing thorough understanding of their impact on outcomes and ability to exploit them to meet intentions.
Typically include
Point light – characteristics and properties,
use diagrams to illustrate. Use own photographs of point light in use, showing
light quality. Analysis of pro’s and con’s of using point light. Analysis of
impact on line/form & texture. Examples of point light used in professional
applications with an explanation as to why it is fit for purpose and being used
in the instance that you choose.
Use images of lighting methods, techniques and materials that enable
point light. Use images of typical sources of point light seen outside of the
studio scenario along with annotation/analysis.
*Use my demo I did with the 8x4 poly-board when I moved the light
from a frontal position to a side-on position revealing the impact on the
surface. Explain what this related to.
Point light – turning the light side-on – why and what is the
impact and what’s the rationale
Diffuse light - –
characteristics and properties, use diagrams to illustrate. Use own photographs
of diffuse light in use, showing light quality. Analysis of pro’s and con’s of
using diffuse light. Analysis of impact on line/form & texture. Examples of
diffuse light used in professional applications with an explanation as to why
it is fit for purpose and being used in the instance that you choose.
Use images of lighting methods, techniques and materials that
enable diffuse light. Use images of typical sources of diffuse light seen
outside of the studio scenario along with annotation/analysis.
How to increase the point light attributes of the Gemini type Bowens
flash heads.
Inverse square law – Detailed
explanation with diagrams showing the impact of the application of inverse square
law in studio lighting scenarios. Use my diagram using planet earth as an
example and a diagram using a lighting scenario in the studio showing how the
white background can be rendered black through the use of the application of inverse
square law. How does this impact on decisions about the size of the studio when
working as a professional.
Angle of incidence – analysis of scenarios
and examples where this becomes an issue with regards the use of light 1. Red
eye. 2, Flat-copying of shiny documents, 3. People wearing glasses. Use
diagrams illustrating the issues and how this over-come.
Light ratios – using your
cameras internal flash. Explain how the flash output can be controlled to
provide ‘Fill-in flash’ as opposed to using it as the primary light source.
Show your cameras settings and the sequence of instruction to enable and use
this function. Use images demonstrating the impact of controlling the flash
out-put.
Auto flash; how does it work? Explain how
auto flash works in conjunction with the absorbency and reflectance of the
subject. This involves an explanation that requires an understanding of subject
failure.
Colour casts & white balance Explain
and show examples of colour casts and how they impact on your pictures. Do they
always need to be corrected, in what situation are they acceptable if ever?
The golden hour – What are the
advantages of the golden hour and in what photography is it frequently used.
What are the key advantages of the golden hour – what is its impact – detailed explanations
and examples of it being used, ideally with your own images. What of the colour
cast?
North light – North light – what is it
traditionally and what are its attributes and characteristics in photography,
what of the colour cast, and how do you achieve it, what is its colour temperature?
Light & Objectivity - What roles does the choice of light have in
terms of objectivity, explain how and why light might be objective? Use example
preferably your own
Light & Subjectivity - What roles
does the choice of light have in terms of subjectivity, explain how and why
light might be subjective? Use example preferably your own
White studio v black studio – Pro’s and
cons. What are the advantages of one over the other.
Controlling daylight Using
reflector boards and baffle boards. Use examples from the class session to show
how you’ve controlled the exposure on the background and the subject with detailed
explanations and floor plans showing your approach.
Lighting Floor plans – Why are they
used? Show examples and show that you have a legend and use a consistent approach
in your use of symbols.
Wide shots of sets – You have to include
these as when they’re used with your floor plan diagram, it enables you to set
up your lights in the same way. This should be explained in your work.
Floor markings – Why are these
used, what are they?
Peoples Gallery component of B2 Unit
The peoples Gallery @ The Forum If you look back at the assignment brief you'll see that there is a context for the work that you're...
-
The peoples Gallery @ The Forum If you look back at the assignment brief you'll see that there is a context for the work that you're...
-
Prompts to generate written responses to your research (Art & Photography). Your research work addresses Assessment Criteria AC1 It...
-
Throughout your work you're required to write up plans for you Photo shoots. Top Tip When you write up your plans, make sure you ...