Tuesday, September 13, 2022

Stand-alone pages: Equipment

 Stand-alone page Equipment                                                                                                      19324


This is best done using a word document with columns. Or, create a PPT and lay it out in columns maybe?

Keep these stand-alone pages as separate documents and just keep adding to them over the period of the course as you use more of the equipment and gain a greater understanding of how it’s used. 

Towards the deadline modify the pages, bring them up to-date making them relevant to what you’re doing and paste the content into your main design sheet. 

Typically, use images of the equipment (Product) and then screen grab the product data sheet. You can use images that show how you’ve used the equipment in your own work,

The Key Part of the work is your own commentary and analysis of your use of the equipment. Properties and characteristics, Pros and cons of using it, why you’ve used, how it might be used and whether its fit for purpose in conjunction with your own work. Another thing you might do is name the components of the equipment explaining how they’re used. In the case of something quite complex (Camera)  this might take a full page of explanations detailing how they’re used. 


Typically, this will be all of the cameras you use, lights, light meter, enlargers, tripods, even small items such as hot-shoe adapters and synch leads. The studio has lots of equipment that can be identified. Probably the best way to approach this is, is to add these items to these pages as you go along. For instance if your processing film and you've not previously identified and written about film processing equipment, that would then be an opportunity to write about...

The developer tanks and components
Drying cabinets
Enlargers
Light boxes
Flat bed dryers
Roller dryers
Enlargers
Safelights
Contact sheet printers
Masking cards 
Focus finders
Easels

*Remember, if you've done this previously copy it across from your previous work and add it to your "Equipment" stand-alone page and update it with more depth and understanding, as this might be the 2nd or third time you've used the equipment. 

Monday, September 12, 2022

Stand-alone pages - Materials

Stand-alone page materials


This is best done using a word document with columns. Or, create a PPT and lay it out in columns maybe?

Keep these stand-alone pages as separate documents and just keep adding to them over the period of the course as you use more materials and gain a greater understanding of them. 

Towards the deadline modify the pages, bring them up to-date making them relevant to what you’re doing and paste the content into your main design sheet. 

Typically, use images of the material (Product) and then screen grab the product data sheet. You can use image that show how you’ve used the materials in your own work,

The Key Part of the work is your own commentary and analysis of your use of the material. Properties and characteristics, Pros and cons of using it, why you’ve used, how it might be used and whether its fit for purpose in conjunction with your own work.

*Keep the bibliographical links from any sources where you've gathered your information.

More suggestions and ideas here Level 3 Photography resources: Materials; How to... design sheets (bteclinks.blogspot.com)

Materials, that should appear in your work...

Films, papers, developers, fixer, stop baths, liquid emulsion, 

Wednesday, September 7, 2022

What the hell am I suppose to be writing? (Pinhole project)

Work in progress (27/8/24)

(1). A lot of the writing you should have already done - The summer project. 


If you've not done it or completed it you need to get a move on and get it completed as it's the research work for the Pinhole project. You need to have it completed by Sept 12th (Thursday) ready to hand in on Friday. 

The work you're producing needs to be produced in digital files, either Power-point or Word. We call these "Design sheets". You'll have 2 design sheets. One we'll refer to as your main design sheet or your main project work and your Summer project work is the research part of the Main Design sheet.

*Have a look at the work started to illustrate how the layout of the work should be (its in one of the display folders.


The important thing is to make sure that it is in your OneDrive in the Research folder which is in your Pinhole folder.

Onedrive - Pinhole Project - Research 

(2) In response to your practical work. 

In the Task sheet -  you'll see that there is mention of what the work needs to address this is linked to the criteria. For Pinhole you need to show that you have A1.3 - Explore & develop creative and technical skills. In essence you simply have to explain how you've used the Pinhole camera and how you've gradually become more creative with the camera as you've developed your ideas and skills. The technical aspect comes with explaining why it works in some situations and not in others and what's required in terms of getting the best outcome from the camera. 

Observations (Written content) can relating to...T

  • The light - it's intensity, type and characteristics.
  • The lens - can it be changed - what impact has a different lens have on the image?
  • The depth and size of the camera.
  • How you've improved the images.
  • How the camera works in terms of focal length and field of view
  • The impact of exposure time - what influences exposure time?
  • The impact of further research.
  • The impact of integrating the use of body language, facial expressions and props.
  • The significance and use of backgrounds.


Finally. 

Keep in mind this is a Photography course and most of the practical work will be conducted in the college using the facilities. BTEC love to see photography in your work. Much of the pass criteria can be evidenced through the use of images/photos/diagrams/illustrations/plans etc, so when you're in college make work - take pictures use the facilities and try and spend time being creative rather than sitting in front of a PC/Laptop typing.

The time to type and write up your design sheets will be when we're in a PC room. Other than that come in early - stay behind, work in breaks and also use the time on your time-table for 'Work Experience' to get your design sheets caught up with. 

Keep on top of it and do a bit every day in response to your practical activities.


Tuesday, September 6, 2022

Power-point Design sheet

I can't believe how easy this is...

Stage 1 - creating the A3 page size

https://www.youtube.com/watch?v=v71RMRHQtAA

File - Blank presentation 


Then along the top click Design a series of options drop down. Go over to the right-hand side and click Slide size and then Custom slide size.  


You'll then be presented with this box in the middle of the screen... In the 'Orientation' box make sure the 'Slides' option is selected. Then reset the "Width" to 29.7 and the height to 42.0 then click OK.


You'll now be presented with this option below... Click the Ensure Fit option.


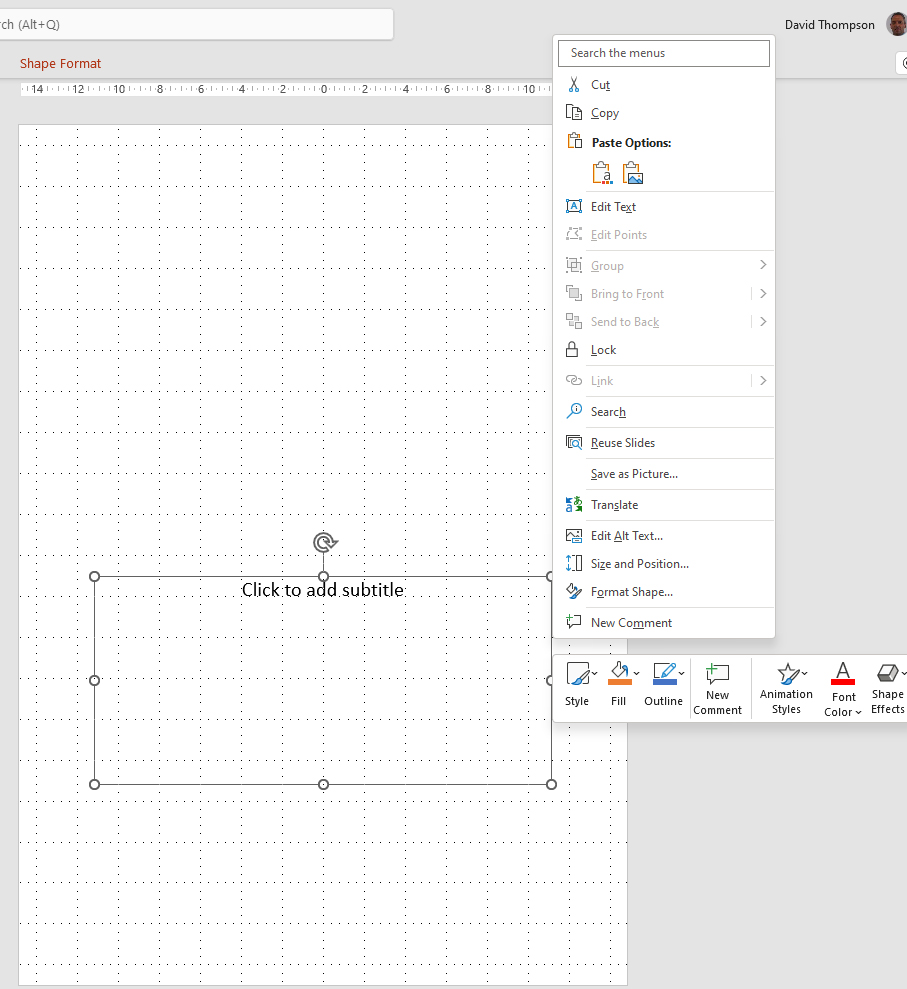
You'll then be presented with the A3 page with 2 boxes. With your mouse - right click on the frame lines of the circular grab points and the options box will appear - select cut and remove both these boxes so that you have a blank page.


The options box...


You'll now have a blank sheet. Now go up to the bar at the top and select insert. From the options choose Text box indicated with an 'A'. Your cursor will probably turn to an upside down cross - click on to the page (anywhere and draw a box about one third of the width of the paper. Then type some words into it. 

High-light the word you've typed and the font and font size options will appear and you can change the size of the text you'll use.

We recommend calibri at font size 11.

You can click into the box and use the return key to make the box bigger.

Simply repeat the same steps to create the 2nd and 3rd column.

When you click out of the box the frame disappears and then comes back if you click back in.


You can zoom in closer by clicking view at the top and choosing a larger option such as 100 or 150 making it easier to type. You can use the same to choose fit to window to look at how the layout looks as a whole page.


The text within the box can be highlighted with colours to highlight specific parts of your work. We recommend you do this with Plans, Health and safety and Reflective work...

 
Pictures are added in a similar way - in fact they're easier to add. Simply go to the top bar and click insert and then go to your image Insert pictures - insert pictures from device. 

Some of your pictures will initially appear on the page very large. Simply grab the corner and re-size. When you re-size be sure to hold the Up arrow on the left hand side of your keyboard to constrain the proportions as you resize the image. If it does distort, go to the top bar and click home and use the go back arrow to return to an earlier point. This can be used whenever you make mistakes.

Planning - Proposing


Use these prompts below to generate your plan

1. Clarify (Describe) what the intention is e.g. why you're making this work, making a direct link with the assignment content.

2. Where - say where your making the images - studio, location, explain why you're doing it there - strengths and weaknesses of the location/studio. Problems you might encounter what you'll do in advance to alleviate those problems. 

3. When - The date, time, explain why at that time, especially if on location - as the light will be dramatically different at different times of day. Be as technical as you can when talking about the light. Write about the time in terms of urgency and the assignment deadline.

4. What with - What camera and equipment are you using, what focal length lens, what tripod, what additional equipment will you need - will you have a back-up camera? Use a check-list in your book, have everything on the check-list - Empty SD card, charged batteries, additional batteries and SD cards. Tripod plates, cables, hotshoe adapters, light meters, extension leads, flash heads and other studio kit (Use the names/brands of the equipment).

5. How (Technique) - Explain how you're going to shoot the images, what approach will you use, how do you want it to look? Is it going to like or borrow something of a famous photographers style or technique? How are you going to ensure that you get the exposures right - what method will you use to do your light readings - maybe explain what metering pattern you use and say why. What are you going to do about your backgrounds? Do your backgrounds play an important part in the images visual language/narrative? How are you going to use the back-grounds - out of focus or in focus? How do you intend to use depth of field generally? What shutter speed will you hope to be using and why? What white balance will you use and why? What file type will you use and why?

6. Who with - Models, assistants, make-up artist, stylists, drivers etc. Who will you use as the model, could you find models? Are you using the same model again and again - why? Do you think that when you show your folio to prospective employers or Universities they might view this negatively? Have you used anyone else to style it or do any of the other roles in photography - see the image below of a Location shoot I witnessed as well as the photographer and the 1 model (Yasmin Le Bonn) there were at least 12 other people... Stylists, Make-up artists, hair-stylists, 4 x assistants, art director. Could your images be improved with more effort and attention to detail?
Whoever you do involve - say what their role is going to be as part of your plan.

7. Using what light Before you shoot, you should have some idea of the kind of light you want, what do you want the light to do - define shape, form and texture, or do you want light that wraps around the subject with low contrast? Again, make connections with other photographers work... I want to get the same effect as photographer a and b and write about the light using the correct terminology. With the light you should write about the time of day and weather and what you're hoping for - you could support this with weather reports - with images of charts showing the weather you'll probably get and then also include a weather contingency plan.

With the light - if you're in the studio use a floor plan diagram and add images or diagrams of the lighting equipment you're going to use and explain why and what effect this might have on the outcome.

8. Health and Safety Many of the units have a requirement to address H&S, so within your plan make sure you write about the H&S aspects that you have to deal with and explain what you do to ensure you, your model and any others that are involved in your shoot are also safe.

9. Weather Mentioned earlier - the weather has a massive effect on location shoots, you might want a particular type of light for your shoot that meets your creative intentions if the light isn't right, explain what you'll do to deal with the light being not quite what you want.


Health and Safety

 Health and Safety comments and identification are a part of Criteria A1.4 (AC4)

When you add H&S commentary to your work make sure you title the work in bold Health and Safety. Also highlight the section using the bucket tool (Word) with a consistent colour.

The types of things you should research and identify...

Darkroom  Printing 

Chemicals. All of the chemicals in the dishes in the darkroom present dangers if handled in-correctly. The most likely cause of injury would be contact with skin especially subcutaneous skin e.g. the soft skin type as seen inside your mouth - inner cheeks, gums etc. Exterior skin is generally tough enough to be submerged in all of the chemicals for short periods of time in most people's cases - picking up prints and tongs from the tray for instance, but you need to wash your hands soon after and not allow the chemicals to dry on your skin. Dried chemicals on fingers in particular can easily be rubbed into your eyes for instance much later on and cause sore dry eyes or potentially worse.

Eczema, Dermatitis, Psoriasis and sensitive skin If you've ever had any of these you need to be especially cautious and always use tongs to move the prints. There are gloves that you can wear and other items including aprons. (Speak to the technician or your lecturer). 

If you observe the rules and don't mess around in the darkroom it's completely safe. Work in an organised responsible way and there will be no issues.

Of the three chemicals the developer is the one you need to show the most respect to. If you dip your fingers in it, you'll feel that it's slippery. Developer is caustic which means it's corrosive, the feeling of slippery-ness isn't the chemical, it's your skin breaking down at a microscopic level. If you put your fingers in developer always wash them soon after in cold water. (Warm water opens your pores and increases the chances of the chemical being absorbed into your skin). 

All the chemicals have something called a "MSDS" Material Safety Data Sheet. As part of your work at a later point we'll look at these MSDS's and learn how they are used in conjunction with COSHH documents.

This is the MSDS for the Print Developer here 

Typically when doing further research into these or any chemicals,  type the initials MSDS and the chemicals name. You'll be offered a set of choices; normally with our chemicals, you'll see the name 'Ilford' or 'Harmon'. Select one of these that has the PDF option. 

These documents are also available in the 'Sink room' in a folder.

One accident that may occur that will need immediate attention is chemicals splashed in the eyes. Note The chemicals that you handle have been watered down dramatically. The MSDS documents relate to the chemicals in their un-diluted state. These are locked away in the chemical cupboards. But if you do get splashes in the eyes you need to wash your eyes with copious amounts of clean water for 5 minutes or so using a eye bath (In the medical kit - sink room). Or a film cannister can be used as a substitute. This will wash the chemical out and you're usually left with a dry feeling eye that may feel sore. This feeling will normally go within a short while. If the feeling persists or gets worse medical help should be sort. (This has never happened in the 40 years I've been using the chemicals). 

Fixer This has another property - staining. If you get it on your clothes the stains will not wash out.

Do not transfer chemicals or water to the enlarger area. The space around the enlargers is a Dry Area as there are cables and plug sockets. Do not put wet prints on the benches where your working. Keep the wet prints in the wet areas or take out in trays to areas where they can be viewed and dried. 

Wet prints in the sink area only.

Bags and obstructions on the floor - Keep any bags or similar under the benches - do not leave these in areas where you or someone else could trip over them. (Trip hazard).

Wet floors - Use trays to transfer prints from the sink to the drying areas avoiding dripping water/chemicals onto the floor. Don't allow test strips or prints to get into the over-flow section of the sink as this will block the drain and flood.

Use the mop or paper-towels (Preferably already used) to dry up any excess water on the floors (Mop is in the sink room). Serious issues tell your lecturer or the technician. (Slip Hazard). 

Clean up your own clutter and waste - throw paper towels in the bin and keep the area tidy. Work efficiently and tidily. 

Glass- Contact printing sheets. If you use the glass sheets to make contact sheets be aware of where you put them ensuring that they cannot be dropped or shoved onto the floor.

Deficient or broken equipment If anything is broken do not attempt to repair it. Do not use switches with wet fingers - the technician or your lecturer will turn equipment on and off. 

General equipment

We use scalpels, modelling knives and scissors and other sharp tools. These need to be used with care to avoid cutting ourselves. Always cut away from yourself, don't exert too much pressure and slip. Store such tools in safe places. If stored upright do so with the blade pointing down.

Roller dryers - avoid baggy clothes, ties, cuffs or similar getting caught in the rollers.


Studio


Location photography


Lifting and carrying

What images should I use for my research pages?

 On the first page of your research you're directed to fill the page with images with an optional section at the end that you can write up your Initial response to the images. 

What sort of images should you use? 

* Most of the images should be from the set/series of images you're looking at in conjunction with your chosen photographer e.g. examples of their work. 

*The other images need to be of a type that help to illustrate how the Photographer makes a living, what it is they do that they're paid for, how and where do they sell their work, who are they commissioned and employed by? 

Dependent what genre they work in (Their operational context)  there'll be different options.


https://www.moma.org/calendar/exhibitions/95?installation_image_index=0
Exhibition evidence.

Type the Photographers name in Google images and pre-fix with exhibition or show. 


https://raniamatar.com/publication/press/2024/

Press.

These are usually seen on the Photographers homepage on their website. Look for a tab labelled "Press". Screen grab either the image as in this example or the list if displayed as a list. 


Front covers 

These are useful in the case of fashion Photographers, simply by searching using the photographers name and "front covers" or specific magazines e.g. Vogue front covers.


https://masoncurrey.substack.com/p/bernd-hilla-becher-creative-partnership


Action shots

Or the Photographer with their camera on location or in the studio.

These can be found using the pre-fix "With camera" or "On location" or "Behind the scenes" You'll often find videos on Youtube showing the photographer at work. Screen grab images that illustrate them working and using equipment or working with models. 


Books 

Some Photographer supplement their income by publishing books as well. So they get a percentage of the sales from the books sold or paid a fee for allowing for their images to be used in the books. 


Website pages

Also use website pages. If your work is re-produced on a website page, you'll be paid for the use of the images on the website page (Re-production rights) and if you write up the 'Copy' e.g. the article, you're also paid for that.

The same applies for hard-copy magazines, you're paid for the use of your images in the magazine and any copy you produce. This type of photograph is "Editorial" work. 


Sold at Auction evidence

Using the pre-fix Sold at auction you can establish whether the photographer make money by selling their work to art collectors and private buyers. 

One of the best options when doing this is 'Phillips' auction website as they detail the materials the work is produced using e.g. the paper it's printed on and the size of the images and the price the work is sold for. All of which help to illustrate ways in which the Photographer earns income. 


Once you're into the auction websites, click on the individual images for further details about size and the materials that they're printed on.

Again simply screen grab and refer to all these visual references in your main commentary on the main page where you write up the detail and analysis. 


Teaching/Lecturing/Seminars

Many photographers also do stints at teaching often as a significant part-time activity - especially if they are Art Photographers. Again, details of this can be found on their homepage in descriptions under "About". 


Peoples Gallery component of B2 Unit

The peoples Gallery @ The Forum If you look back at the assignment brief you'll see that there is a context for the work that you're...